Just in a couple of days one of the biggest software events FOSDEM 2021 will take place, for the first time completely online. Hundreds of talks will originate from behind laptops, phones and workstations. Realization of this fact was the last link in the long chain of events leading to me writing this reference. Being a sound engineer by trade I, presumptuously, hope to attract attention of the speakers-to-be to the sound quality of their presentations. However, I tried to do my best to compile and present a generally useful reference, not a dumbed down step-by-step guide doomed to be rendered inapplicable by slightest variation of circumstances.
2020 has been a year of video conferencing. More people than ever now work from their homes and socialize utilizing not just text, but video and sound. Technical details which once were of interest to those in media production, podcasting and streaming now also concern (or, at least, they should) much broader audience.
Whether you’re about to give a talk, stream your coding session, hop into a jitsi meeting for your work, roll some d20s in an online tabletop session or just chat with friends, I hope this guide will help you to be heard.
Personally, I always liked lectures. Seeing and hearing a knowledgeable person explaining the topic of their interest with passion always makes a great impact on me. Especially if it sounds good. Unfortunately, in my opinion people pay much less attention to the quality of their sound than they should (compared to video), considering it’s not such a hard topic to understand. Few things frustrate me more than watching an hour-long video of a beautifully presented topic spoiled by low speech legibility, distortion and clipping, ridden with extraneous noises, copious reverberations and immoderate processing.
More and more educational and recreational material appear in video form and I’d like to share some of my knowledge to help bring up the overall quality of the sound of those videos at least a little bit.
The obvious first question one may ask is how this particular guide stands out from hundreds of others already available? Trying to answer it, I came to the following formula: This document will present a set of strategies (as opposed to directives) working towards a number of goals, while explaining the basics which are necessary to understand why we perform the described manipulations, thus empowering the reader with the knowledge to apply in the widest set of conditions.
The goals we set are:
I’m a studio engineer and a musician, not a broadcasting engineer. I never worked on radio and I’ve never been a fan of my own voice to start a podcast. Some of the terms I use may differ from the broadcasting industry lingo. However, I’ve recorded speech and singing on many occasions in a vast range of circumstances and the techniques described are generic to all sub-fields of sound recording/processing. I also believe in a lifetime of learning, so I welcome any corrections and constructive critique.
Let’s consider the broad view of what’s happening when we capture and record a sound:
The main thing we can notice about the process is that everything happens linearly, in other words, the sound passes all the steps in order (except the reverberation, which may introduce earlier sounds into currently happening ones, more on that in the Acoustics section). This brings us to several important observations:
This probably reads too hand-wavy and vague, but we’re about to see time and time again how these realizations can help us make practical decisions.
The golden rule applies: the better the source material, the better the result. Voice coaching is completely outside the scope of this reference, but just bear the rule in mind and please, read a little bit on voice health, especially if you need to speak regularly for considerable amounts of time. Everyone understands what speech characteristics people usually want to hear, so do your best but avoid strain at all costs, drink lots of water and don’t forget to breath from time to time.

Acoustics and acoustically treating the space in which the recording takes place is arguably the most important step of the whole process. It’s easy enough to test: try recording in vacuum and see how well it goes (on the second thought, don’t)! On a serious note, besides our voice, room acoustics is the most early introduced factor which we can really control to shape our sound.
The sound is the vibration of the medium, and our medium is air. While human speech has some significant directivity (see figure), the big portion of the sound travels in all directions. Then, it gets repeatedly reflected by the objects around us while some of the energy gets absorbed and dissipated to heat. Some of the reflections inevitably get back to the microphone (and our ears) and since the path of every bit of the reflected sound is longer, it takes more time to arrive. The sum of all the reflections arriving to the receiving end forms the unique signature of the space and this is how your boss knows you’re participating in a conference call from your bathroom.
The rate at which the objects hit by the sound waves dissipate the energy is called absorption. The sound gets absorbed differently depending on the frequency and the absorbing material. Generally, the higher the frequency, the easier it’s to absorb. The other important property is diffusion: the more geometrically complex the path of the reflected sound is and the more variation of the ways the sound reflects in a space there is, the more it gets “spread out” to a multitude of reflections of lesser energy and the less prominent each separate reflection is (note, this is technically not the exact definition of sound diffusion, just a simple way of conceptualizing the process).
What’s more, less diffused reverberation may further degrade speech legibility by introducing phasing issues such as comb filtering. The closer the reflecting surface is to the microphone, the worse it’s going to sound, as the reflection will be just slightly time shifted compared to the direct sound thus introducing more phasing artefacts. This is another reason why internal laptop microphones will always sound bad - they catch the reflections from the screen surface and a table it’s usually placed on. With your smartphone you can also observe similar effect: try to record your voice with the phone laying on a hard surface and then lift it up in the air preserving the distance - there’s a great chance your voice will sound better.
The sound in an empty room is much more “echoey” than in a regular living room with lots of objects made from different materials for the two causes mentioned above: there’s not much absorption nor diffusion going on. The hard open surfaces of an empty room produce more direct reflections and preserve much more high frequencies. The geometry of the room itself also contributes: to put it simply, the sounds bounces more between parallel planes.

What we want to is to increase the direct-to-reverberated sound ratio and “soften” the reverberation by diffusion, and now it’s obvious how to achieve that:
We need to specifically mention “professional” sound treatment materials. Let’s not go beyond the fact that it’s a giant rabbit hole and an industry with the only goal: sell you as much of the stuff as possible. My advice: unless you’re really serious about sound recording or you really get the hang of the process, don’t bother. It won’t hurt, but it’s probably a pricey overkill. If you insist, look at absorption panels first (bonus points for DIY ones), and acoustic foam last (try looking up the photos of most famous/expensive recording studios and spot any foam pyramids there).
Before we touch upon gear and processing we need to address the elephant in the room: monitoring. To assure the best sound quality you need to constantly hear your own voice in a form it’s departing into the wild, as well as other sound sources (such as voices of other participants in a conference call). The only reasonable way to do it is to use headphones/earbuds. This provides total separation for the microphone to pick your voice only and completely eliminates the issue of feedback, which can otherwise be only partially alleviated by echo suppression.
Bad news: you need a mike. Internal microphones in laptops and webcams are extremely poor, smartphone mics are better, but not by far (with rare exceptions), smartphone headsets tend to provide better results as they bring the microphone closer to the sound source, but the mic quality is usually poor, they also are susceptible to handling noises and often get troubles picking sounds from “dead-zones” (hanging under the chin) due to questionable directionality. Telephone and gaming headsets are hit-or-miss, but the quality of the microphones is usually seriously lacking. It’s not just sound quality, everything mentioned usually comes with more noise and less robustness compared to a proper microphone.
Fortunately, microphones are more affordable than ever and even the most budget-friendly models nowadays perform fairly adequate. Don’t shy away from the used market, it can save you some money and you’ll lose less if you ever decide to sell it.
Which one to buy? To choose a specific model you need know a bit more technical stuff, but a couple of general hints beforehand: don’t go with the cheapest one, give preference to models aimed at podcasters/broadcasters or vocals, favour reputable pro-audio brands to no-names or consumer electronics, watch a couple of comparison videos with the sound samples.
Non-usb microphones require a connection to a pre-amplifier in an audio-interface or a mixer and this is the type I suggest going for, as it usually allows for more flexibility and freedom of choice. USB-mics are more compact and easy to connect, but the available range of models is smaller and they tend to be marketed more at an entry level, with the corresponding design choices.
Putting the connectivity aside, the main characteristic of the microphone is its transducer type. There’s a few of them, but the two which interest us are the most used ones: dynamic microphones and condenser microphones. The main differences between the two is the mass of the diaphragm which has to be moved by sound pressure to produce electric current. Dynamic mics require the sound waves to move far more mass which results in lesser sensitivity, thus requiring more amplification for the same output level. More mass means more inertia, so dynamic mics have somewhat reduced high frequency response. Condensers, on the contrary, are far more sensitive and generally have a wider (extending farther into the highs) and more balanced frequency response. However, to function properly they require external power, which is usually provided by means of phantom power (every audio-interface with a microphone input has it).
There’s no clear winner here and both types are used heavily for voice-overs and broadcasting. Dynamic microphones, such as the ubiquitous Shure SM7b, legendary Electrovoice RE20 or praised Heil PR40 are used as often as condensers such as Rode Broadcaster or Neumann BCM104. What is important to know, is that inherent differences between the two transducer types dictate the use cases:
Every voice is unique in terms of its spectral signature. This is one of the reasons for such a wide selection of microphones with seemingly identical features available. Frequency response of a mic may complement the timbre of a voice or, in complete reversal, draw attention to the features we usually think of as negative: you don’t want to use a microphone with accentuated lower parts of the midrange for a really nasal voice. Frequency response plots provided by manufacturers can give you a general idea, but nothing beats hearing the sounds with your own ears and experimenting. Besides that, there’s a couple more things to consider:
S. It’s a spike of energy in higher frequencies so with condenser mics this issue is usually more prominent. It’s possible to fight sibilants during later processing ("de-essing"), but it helps to assess you voice qualities and choose the mic accordingly.Polar pattern is a plot which represents the sensitivity of a mic for sounds arriving from different angles around it, i.e. its directionality. At this point the only thing you need to know is that you most probably want a microphone with a cardioid pattern, fortunately, most vocal/broadcasting mics are cardioid. Don’t sweat it if it’s super- or hyper-cardioid, it’s going to be fine too.
If your microphone, audio-interface or a mixer has a low-cut switch (also called the high-pass filter) which cuts the sounds below 80-140Hz, engage it. It will help with an occasional low-frequency vibrations and other unwanted rumble.
At almost every stage of voice recording in both analog and digital domains you’ll have the ability to set the gain which is the amplification of the signal amplitude which translates directly into volume. Excessive gain might lead to overloading the following stage and producing clipping distortion as a result. We don’t want that. Almost every stage also contributes a bit of self-noise, so if the signal gets unnecessary quiet at some stage, the volume drop needs to be compensated by a higher gain at the following one, increasing its noise contribution proportionally. Fortunately, most modern gear has low self-noise and broad dynamic ranges (ratio between the loudest and the quietest sounds which can be captured/processed). This, arguably, makes the traditional craft of gain staging less relevant today. Humans, on the other hand, are very sensitive to distortion, which leads us to the simple rule of thumb for setting gain: be conservative and avoid distortion.
Most people are either completely oblivious to gain staging which results in huge swings of volume between stages or tend to max everything out which inevitably introduces clipping sooner or later. It’s especially important to pay attention to gain structure of your recording chain as we’re going to dive into dynamic processing, which exhibits nonlinear behaviour, meaning, it reacts differently and non-proportionally to changes in input level of the signal.
I suggest monitoring volume meters at every stage of the processing chain where they are available. It’s hard to give exact numbers for recommendations, but most meters are colour coded for a good reason. During speaking, make sure you never hit “the red zone” (occasional cough is ok) and try to start hitting the yellow parts of the meters only during more intense parts and only in the latest stages of processing. The safe corridor for the meters to fluctuate in lies somewhere between -24dBFS to -10dBFS.
This section is a bit theory-heavy, and I’m holding back any practical advice for after explaining the nature of the processes at hand, so I need to mention suggestions and directions are coming just a few paragraphs below.
NB: In this section I describe most of the processes assuming them happening in a digital domain, where the vast majority of the readers will use them. Most of the info here applies to analog units as well, with an odd nuance or discrepancy.
Let’s start with a polarizing statement: all there is to sound is changing volume. Indeed, when musicians get past the creative phases of composing, recording and carefully (or carelessly) selecting timbres, tones, sounds and effects, the only thing left is to fit it all together and make it sound good. This is a work of an audio engineer, and we achieve that mostly by three basic actions: setting balance, equalization and dynamic processing. The same applies to processing spoken word. Each of those actions boils down to changing volume: balance is relative volume between different sounds, equalization is changing volume of different parts of the frequency spectrum and dynamic processing is changing volume based on… volume. Eh?
I believe this is the first obstacle on a path to fully understanding how dynamic processing works. And I suspect the topic to be the most widely misunderstood one in sound processing while being one of the pillars of the field. The second obstacle: the most basic use case for compression (the main type of dynamic processing) is making sounds louder. Why is it called compression then? Eh again. What adds to the confusion, is lots of hardware and software compression units simplify the process and hide the basic controls of the underlying process, combining several into one and/or leaving only those required to bump up the output volume.

The mechanics are in fact simple: constantly measure (each sample or some average) the level of the input signal and whenever it gets above the certain level (Threshold), gradually start decreasing the volume (Attack) of the overshoot by a set Ratio, when the volume drops below the threshold, gradually (Release) stop decreasing the volume.
To be technically correct, getting stuff louder is in a sense a side-effect (precisely, non-effect) of compression, which actually decreases the volume (compresses the amplitude) of the sound. The overall volume can be additionally increased, regardless of the actual compression happening. Strictly speaking, this final volume adjustment is a convenient supplement to the compression and not inherent to the process itself, but it’s so useful that you probably can’t even find a compressor without this feature.
Let’s reiterate and examine the various parameters of a generic compressor. Your particular unit may lack controls for some (or most!) of them, which means it’s either has them set to some arbitrary (I meant scientifically chosen) value, or it tries to adapt these values internally to source material or user-facing settings in some “smart” (no doubt, obvious and completely predictable) way.
Limiter is just a specialized compressor. It’s used to make sure no signal gets above the threshold, so its main characteristics are very high ratio and very fast attack. There’s no standard to what is considered very high ratio, but traditionally everything above 10:1 was considered as limiting, Wikipedia offers 60:1, but technically the proper limiting ratio is ∞:1, which is achievable in digital world.

It’s logical to assume that expansion is a counterpart to compression and it acts by increasing level above the threshold, but it’s not exactly how it works (this is actually a description of a distinct upward-expansion rarely referred to as decompression)! Regular (downward) expansion still reduces the volume, just not above, but below the threshold. The description of parameters from section on Compression still applies. Somewhat non-intuitively, attack still works on crossing the threshold up and release still on crossing down. The range is set in a mirrored way: 1:X, meaning for each one dB of the input volume below the threshold expander reduces volume by XdB. Due to the working at different sides of the threshold, the exact numbers for ranges of expansion and compressors feel differently: you’re much more likely to tweak decimal places for expanders than for compressors.
As with limiting, Gating is a downward expansion with a very high ratio. The primary use case is to completely cut the signal below a threshold.
Additional parameters, more frequently associated with expanders and gates:
Excessive noise is a serious problem, especially for capturing sound in uncontrolled environments, so there’s been lots of research and resources thrown at the problem. Telecommunication companies have driven lots of innovation there and it’s fascinating how many ideas were used and reused both for noise reduction and data compression for speech specifically.
The tremendous advantage to using noise suppression/noise reduction compared to noise gating and downward expansion is that the former eliminate the background noise even during speaking, while the latter affect only the pauses. This advantage comes at a cost, though.
There’s lots of programs and plugins for noise reduction, based on different algorithms. One of the basic but effective approaches is capturing the spectral profile of the noise and than subtracting it from the signal. Unfortunately, this degrades the quality of the speech and in cases of low signal-to-noise ratios might render the sound completely illegible. Primary the higher frequencies take the hit, that’s why overly processed speech has “blurred” consonants and sounds muffled. With the advent of neural networks solutions based on this technology appeared. One example is Xiph’s RNNoise, now also available as a filter for OBS Studio, LV/VST2/LADSPA plugin and an ALSA plugin. It’s impressive, but still, the sound quality suffers.
I strongly advocate for using noise reduction software only as a last resort. With a proper microphone, reasonable settings and a regular living-room environment they are unnecessary. I’d be more lenient if widespread realtime solutions such as RNNoise filter in OBS Studio allowed to tweak the strength of noise reduction, but at the moment it’s either fully on or fully off, which is almost never used in regular sound editing/restoration/forensic scenarios.
Now we should have a solid understanding of what every bit of processing at our disposal does, so it’s time to apply this knowledge to the goals we set earlier. The process requires experimentation on your part so set everything up and be ready to test your voice.
When the sound signal finally arrives to processing it’s almost always either too quiet or too loud. The obvious thing to do for both situations is to compress the living thing out of it and be done. It might work and I’ve even seen whole guides which summarized to this but we aspire for much better results.
First, get your gain staging in order. Try to get the volume to the “safe range” as it’s also the most convenient to work with. Second, as you may remember, sound processing is cumulative, so the next thing to do is to get rid of the excessive noise, as we’re going to boost the volume later and we don’t want to boost noise. Don’t use noise suppression though, the signal is probably not loud enough yet and noise suppressor will “grab” too much, leaving you with unintelligible mumble. We also don’t want to use hard gating - there’s always going to be some ambient noise under your speech, and gating will result in an unduly contrast: your voice will appear out of dead silence together with the noise. It’s ugly and fatiguing. It means what’s left is expansion, and indeed, it’s the ideal place for a soft downward expander. Speak at the lowest volume you’re expecting to talk and set the threshold about 4dB lower of what your input level is. Be gentle, set the ratio in 1:1.2-1:2 range, soften the knee a bit (if available). This way we’re under no serious risk of getting choppy sounds so attack and release can be rather fast. It’s also good to test the settings with usual noises: tap on the table, type a bit or click the mouse and see if it’s helping.
Then, we need to work on dynamics of the voice itself so we’re going to compress it. Reducing the dynamic range will help the voice translate well regardless of listening conditions and gear used. Most humans on Earth are conditioned by radio, TV, audiobooks and music to hear compressed voice and that’s what they expect. Compressed voice gains perceived “density” and feels more substantial. We don’t want to overdo it though (especially for video - the picture helps comprehension), as we’re not fighting problematic reception and not competing for grabbing attention during channel switching as radio broadcasts do.
I find it tremendously useful to conceptualize the dynamics of the sound as two processes happening in parallel on two timescales: macro- and microdynamics. First one governs the flow of the sound, the relationships between different words, phrases and longer parts of the speech. When you lean back on your chair, when you get excited and raise your voice, when you forget about the mic and speak under your nose or turn your head away you’re affecting macrodynamics. The second one happens on a much shorter timescale: it’s the difference in volume between different parts of a word or even a single sound and it depends on personal voice qualities (temperamental and physiological). In studio work or broadcasting macrodynamics are usually dealt with with the help of a sound engineer tweaking levels in realtime or during editing, but we’ll rely on compression.
Add a compressor. If you have the option, switch it to fairly slow RMS mode (5-10ms). Set the threshold roughly at the same level plus 0 to 5 dB to the previous expander, just not lower. We want to compress almost all the working dynamic range of the voice, so tweak the threshold accordingly. The higher the threshold is compared to the first expander, the softer you can set the knee of the compressor: whopping 12dB is perfectly fine. The ratio needs to be very gentle: 1.2:1 to 2:1. Attack doesn’t matter so much with these settings so set to taste: 5-15ms should work. Keep release on the slower side: 150ms and above. By this point the volume probably needs raising, so speak normally, observe the peaks on the output meter and apply make-up gain to get to our comfort zone of -20 to -10 dBFS.
If ambient noise is still a problem, this is a nice place to cut out some more. Since we adjusted the level previously, the noise also should have become more noticeable. If you’d like to use noise suppression (against my recommendations), this is the place for it, just keep it to the minimum. Otherwise, stick to expansion again. It’s almost impossible to recommend exact numbers, set the threshold so it doesn’t work while you speak and, importantly, while the previous compressor is working (observe the meters of the compressor, if present, especially the Gain Reduction). I also suggest starting with the threshold from a lower level than the first one (even though due to volume adjustment between stages it might be a higher absolute number). Remember what we said about the final effect of different stages being co-dependent? Both expanders will be working alongside each other, so the effective ratio of noise reduction is a product of both, which means you’ll probably settle to even lower ratio for the second one, depending on the threshold.
One of the persistent issues arising as a consequence of fighting noise are artifacts in transitional phases between speech and silence. Beginnings of phrases can often get chopped or smudged and endings grow distinctive “tails” of noise, which is extremely annoying. When using expansion and noise gating, more tweaking of the threshold, hysteresis, attack and release are necessary to alleviate the issue and with noise suppression processing the strength of the effect or wet:dry ratio needs to be decreased.
Now we need to deal with microdynamics. Add another compressor and set it to act on louder sounds. Prefer the unit acting on peak measurements. As a start point for the threshold, aim to compress the top third of the dynamic range of the voice. Depending on previous settings, the ratio will need to be somewhere between 2:1 to 4:1. You can really see I’m shooting from the hip by this point. Set the attack and release on the faster side: 2-8ms and 40-120ms correspondingly. Speak with intent and tweak accordingly. This should really affect the character of your voice, especially obvious after you apply some make-up gain to bring it up.
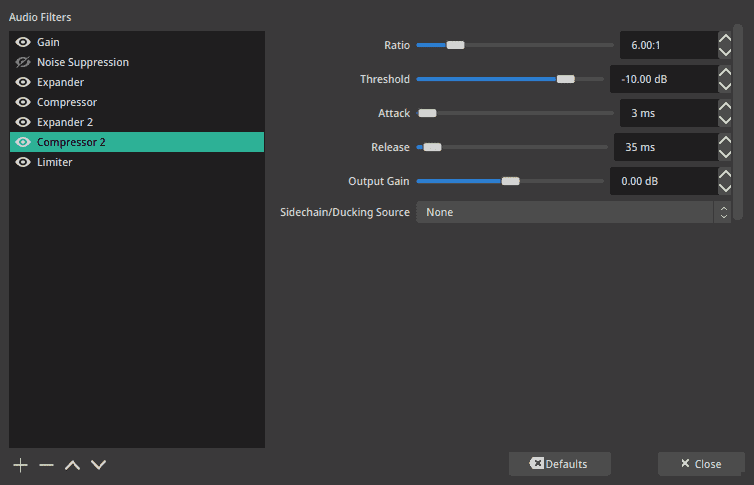
We’re almost done, but we need to take care of occasional peaks: coughs, bumps to the mic, falling furniture, SWAT storming the place, etc. It’s a proper place for a limiter, use that if you like, but for voice I prefer rounding the peaks with another compressor. Set the threshold at about -3dB, the ratio to about 8:1 to 12:1, fast attack of 0.5-2ms, fast release of 10 to 30 ms, a small knee works great here. Cough, clap your hands, speak closely and directly into the mic and tweak the threshold to catch the peaks. With lower threshold you can release the ratio a bit. Considering it’s the third compressor in the chain, it really should not work 99% of the time. Look at Gain Reduction meter, the previous two compressors have to do most of the work, so you’re expected to see maximum a couple of dB of volume shaving. If you’re producing loud noises but the final compressor/limiter isn’t engaging at all, you either compress the sound too much in the previous stages, or the volume of what’s coming into the final stage is just too low. Either way, the main thing we want is to prevent clipping. Adjust the volume to a comfortable level, but leave some space to add if the need arises.
Done! Don’t treat the numbers here as set in stone, what I wanted to convey is the general idea and relative difference between the stages. Tweak to taste. Let your ears and the ears of your listeners be the judges. In the end, if it sounds good, it’s good.
This reference grew much longer than I anticipated, so some topics were completely omitted. To give a final few heavy-handed suggestions and direct the motivated reader to further research:
There’s probably much more information missing, so I’d be happy to hear your suggestions and opinions in the comments.
Thanks a lot for reading and hope you’ll sound better than ever!
Wouldn’t it be great to have a bunch of references like this in a wiki- or, preferably, curated git-based form somewhere, where more deep and detailed references could be assembled and where more practical guides for specific applications could be held, something akin to old hydrogenaudio wiki? If you know the right place, please share.
Feel free to discuss this reference in disqus comments below, join the #mixing:matrix.org room where I hang out or ping me directly on Matrix @thirdhemisphere:matrix.org. Other ways to contact me are listed here: About. I’m always open to new collaborations and I love meeting new creative people.
My studio: thirdhemisphere.studio